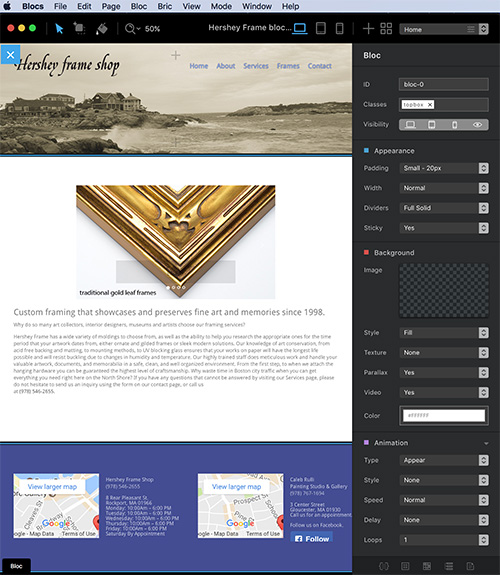
The workspace of Blocs shows the three sections Header, Main, and Footer filled with content with Sidebar at right. You can navigate between pages using a menu at the upper right.
The web design application Blocs 2.2 and Beta 2.3 review and tutorial
Months ago, I began working on a re-do for a client’s web site. Right as I began I discovered that the web design software that I had been using since 2010, Softpress Freeway, had quietly gone out of business. I could not in good conscience continue using it. So I began a search for a replacement. Some products were based on templates. Some required a monthly subscription. Others required you to host your site with the company that made the software. Finally, I decided to try Blocs. Like Freeway, it was another product made in England. Unlike Freeway it was very new and had a different approach to building web sites. System requirements are just a Mac and OSX 10.10.
How Blocs works
First we are presented with a blank main home page with empty header, main, and footer sections. Clicking on any of these sections brings up the Blocs menu, which is where basic structure is defined. The user can select types of Blocs at the top and then scroll through these using the arrows to choose from the types found under basic structure, navigation, headers, carousels, galleries, etc. Basic structure blocs are provided for the simplest layout with one big box or multiple columns with space for headlines above. While some Blocs are available to give you a whole template. Brics are there to create and customize exactly what you need for your content. You can duplicate Blocs or Brics by selecting them and using the commands or control clicking you can also move them up and down. Sometimes I have found it hard to add the same item I just created and duplicating the whole row seems to be better, like right now.
The header section of the page, like the footer, is by default “sticky” (appearing on every page by default) and is where almost everyone will drop in a navigation bloc, of which 7 types are provided with nav and logo left, right, or center. Once one begins the site, creates pages using Page/New or the plus icon in the upper right, defines the navigation as a class, under the Class Manager, that can be customized for fonts, size, and colors the next step is to drop in content. As each page is created and named it automatically appears as a link in the main navigation. The navigation is customized using the Menu Manager. Here you can change the name of the links and change their target. One can also make sub menus and have the links go to those as well. Switch between pages using the menu in the upper right of the screen.
Once you have defined your pages, you can fill the middle section with what you want on each. Again, drop in a Bloc. When you click on the Bloc, or press the letter “d” a plus sign will appear below it and bring up a menu of Brics at the bottom of the screen. You can access the complete selection of Brics by moving the mouse arrow onto the grey strip and a plus inside a circle appears on the far right. That page has a search field to help find what you want. Brics are basically more about specific content like headers, paragraphs, images, carousels, videos, forms, etc. There is also a basic HTML widget that allows you to dump in code. I used these to make Google maps for a client’s two business locations. However, I could not get the Javascript Facebook Like button to work. So I went back to an iframe version that fired up immediately.
Some basic text formatting is available at the top of every text box, by clicking on it. You can also add a link, and in the Beta create a span.
Basic Text Handling
Clicking on a Bric containing text will bring up a blue strip on the upper left of the box, which will alow you to make basic changes to the style of the text such as bold, italic, underline, strike through, and also allows you to define selected text as a hyperlink. In the new Beta release an additional icon allows you to define selected text as a span. This is important for work flow, because in the past text would need to be chopped up into headline a paragraph containers, not just flowed in all at once. That’s a real time killer if you are given all new copy to drop in. Re-applying classes to headlines is still a pain, but it is still so much faster than cut and pasting into different boxes. When you click on a text area, options also appear in the sidebar that will allow you other options. Beyond that you will need to set up basic customization in the Project Settings or more advanced choices in the Class Manager.
Please note that sometimes selecting the box and getting the blue strip can be weird and clicking on some other area and trying again may help.
A complete spell check system, not just as you type would be nice to have.
The sidebar changes depending on what you have selected.
The Side Bar
This appears by default on the right side of the screen when you select an object on the canvas allows you to customize certain aspects of your selection, as well as to assign classes, which in the Beta is npw a menu selection (See below). These options will change depending on what you have selected. For example, drop in a carousel, select it, and you can choose images that appear in it, change the order, and in the new Beta change the transition type to a traditional fade in and out. That was actually one of my suggestions. Select a text area and you can change the font, size, line height, alignment, and color without having to define a new class.
There is a Data choice that allows the page name, title or description to drop in to your text box. I see little reason for this feature, because repeating the same thing is not something Google and other search engines reward, in fact quite the opposite.
You also have settings here to control the type of mobile or ”hamburger menu” that you want to use and the icon that appears for
Different interactive animation options are provided for things like images or text. For example you can have an image fade in by default using “Appear” or when you hover over it, or make text pulse, flip, stretch etc.
You can also add Tool Tips so that when someone hovers over something a note appears.
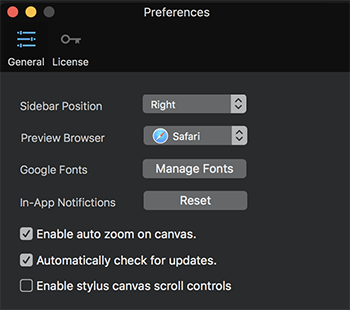
The most important things here under Preferences are what browser to preview in, where you want your sidebar, and managing your font collection.
Preferences
Under the Blocs menu, you will find Preferences. Here the left or right position for the Sidebar of tools can be set. The default browser for previewing can be chosen. You can manage fonts, which at this point means that you can add or remove Google fonts from their web site by copying the code from Google and pasting it in place as you add a new font. Being able to add font packages from places like Font Squirrel or wherever would be nice.
Project Settings
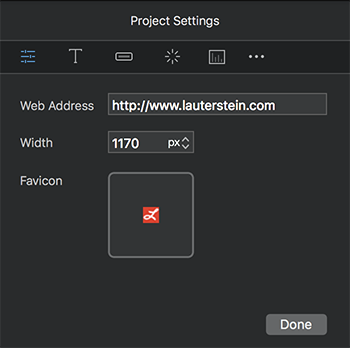
On the first pane you can enter the web site address, which has the benefit of allowing the program to generate a site map upon exporting your project to HTML. The next field down controls the width, in pixels or percentage of the screen width of the site. The default is 1170 pixels wide. The final field allows you to click it and then choose a favicon, a 16 x 16 graphic, to appear to the left of your URL address in browsers. Typically this file is a PNG or GIF for crispness, as the favicon is usually a letter or simple graphic.
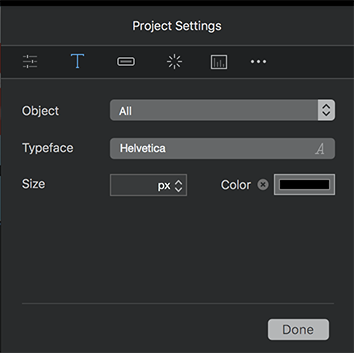
On the second pane of Project Settings, You can select the typeface and its size and color for individual headers, paragraph, links, and labels. You can also just set the default for everything and then assign what you want directly on each page using the sidebar or with Classes defined in the Class Manager.
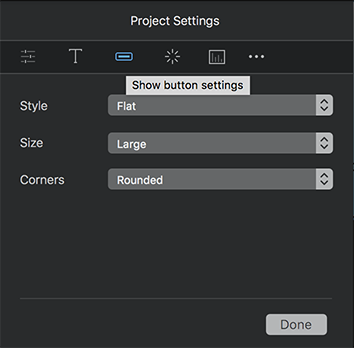
The third pane allows for the customization of buttons, including four styles of flat, clean, glossy, and wire. You can also choose sizes of small medium and large and whether corners are rounded, round or square.

The fourth plane allows you to set the preloader that will appear as the user sits and waits for your site to appear. There are ten choices including gears and the infinity loop.
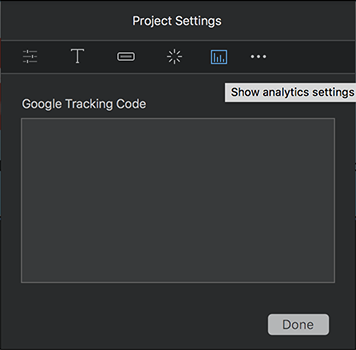
The fifth plane contains a field for you to enter your Google analytics tracking code script. This is not just the letter and number combination that you may think of as the code.
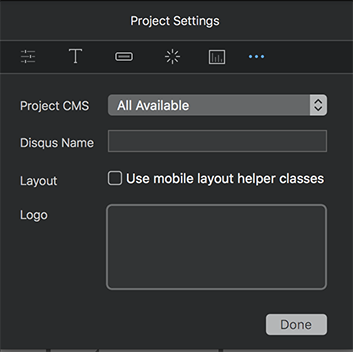
The sixth and final pane allows for the selection of CMS of choice, as Blocs can create themes for Pulse, October, Cushy, and Surreal. The default is set for all. You can also enter your Disqus name if you want. You can check the box for mobile layout helper classes, for which I find no documentation. Its default mode is unchecked.
Page Settings
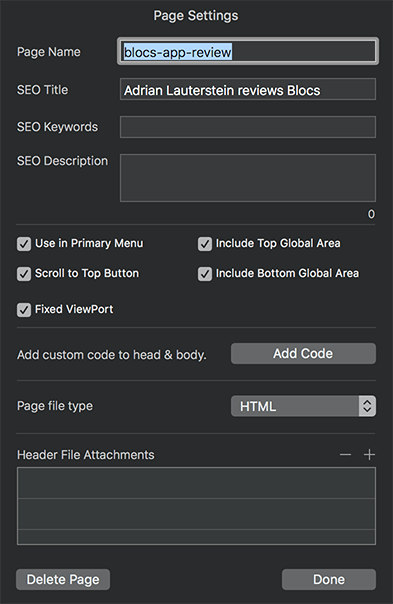
Once you have created a new or duplicate page, either buy choosing the Page menu and New, or by clicking the plus symbol in the upper right corner of the black bar at the top of each page, this is where you can re-name and it and give it a title. Below those fields is the now mostly useless keyword field and the much more important SEO or Meta description field.
Below that are some check boxes.
The first allows you to choose whether the page appears automatically, in the Primary Menu.
The second will insert a button at the buttom of each page that will allow you to jump back to the top.
The third allows you to decided if users with mobile devices can zoom in and out.
The last two allow you to decide if the new page will continue the “sticky” headers and footers found on other pages.
The add code field allows you to add custom code to the header or the body of the page.
Page attachments allow the user to atach things like java Script Frameworks or additional CSS to the page.
Be aware that as of this writing, both the commercial release 2.2.2 and the Beta 2.3 suffer from a bug in Page Settings. If you enter some text and hit “save” or Command s instead of the “Done” button changes will not be saved and the Page Settings option under the Page menu will go grey until you close and re-open the document.
Bloc and Bric Menus
These two menus allow you to move and duplicate Blocs and Brics. You can also scale and change the alignment of Brics.
View Menu
This sparse menu allows you to use use View Mode Toggle between editing and previewing the page within the program. It also allows you to zoom in and out between 50% and 100%. You can also choose to preview the page in Desktop, Tablet, and Mobile modes. Finally, you can choose the safest move which is the Preview in Browser. Remember, you can set up Safri to have a Develop menu that will allow you to view the file as numerous devices will see it, using Enter Responsive Mode.
Mode Menu
This menu lets you switch beween Normal, Drop, and Paint modes. Drop brings up your selection of Brics to put into Blocs and Paint allows you to apply colors using the paint bucket.
Window Menu
Along with allowing the user to minimize or enter full screen mode, this menu also allows you to close the project, which is also found under the File menu. That is an odd redundancy, to say the. There is a Zoom command, but no matter what I set the zoom to elsewhere, it stayed grey.
In the second part of this menu, you will find some of the most important parts of this software.
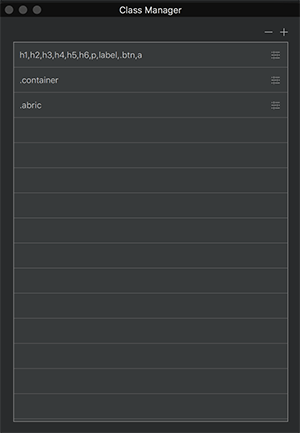
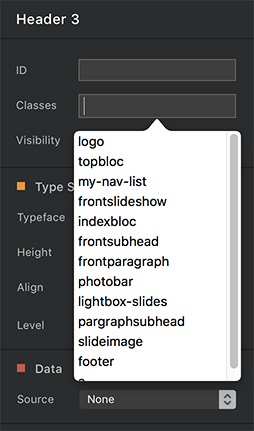
The Class Manager
The Class Manager lets you define classes, which you probably used to call styles, that can be applied to Bloc structure and Bric components. There are two existing classes. One lets you customize headlines and buttons and one for Container. Once you have created a class using the plus icon on the upper right, you can click on the icon to the right of it and that brings up the panes that allow you to control it. In earlier versions, I had problems deleting clases and recreating them because the program would think that the deleted class was still there. There were also some problems with classes defined in the sidebar, on the fly, not appearing in the menu. That has also been fixed. iIn the Beta I am testing classes can be applied from a menu on the side bar opposed to typed in from memory or cut and pasted from the field in the menu manager. This is a huge improvement in terms of productivity and sanity.
One other odd thing that I found was that while you can choose colors when you set up a class, you cannot choose from the programs swatches found when choosing colors from the sidebar. Meanwhile, the sidebar swatches cannot be modified with different opacity. So make note of the hex numbers from any swatches you have created, as you will probably need those later. Hopefully this will change soon.
When you add a class, there is also an option to choose from a list of pre-made custom classes that help define interactive and other aspects of the project, like button, navigation, arrows text, image, lightbox, carousel, and tooltip options.
These setings can be customized for each break point that the software currently provides; desktop, tablet, and phone.
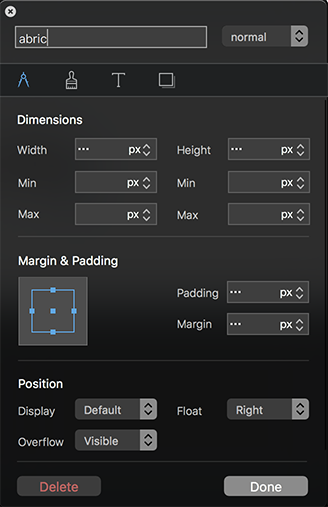
The compass pane allows you to control Dimensions, Margin and Padding, and Position.
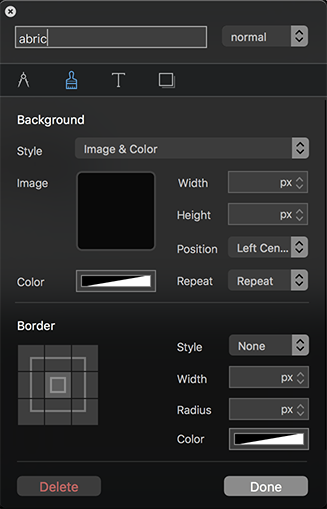
The paintbrush pane lets you set the background color and opacity or image. The menu allows for a gradient option. In the case of the image it allows you to control the dimensions, position, and type of repeat or no repeat. Below that you can set up a border style.
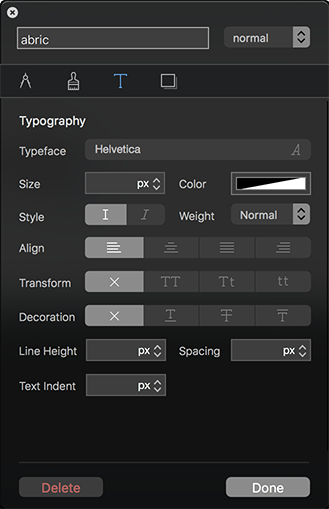
The letter pane allows you to control aspects of typography and color.
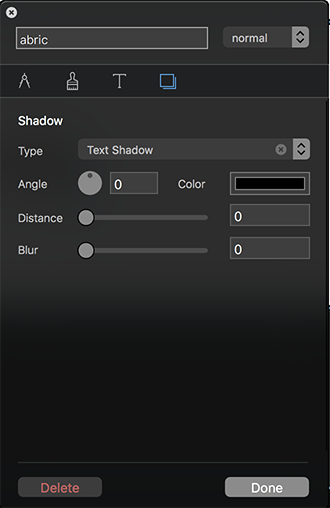
The shadow pane allows you to define drop shadows for text or objects. I used the drop shadow on this site to give the small preview images in my galleries some pop against their background.
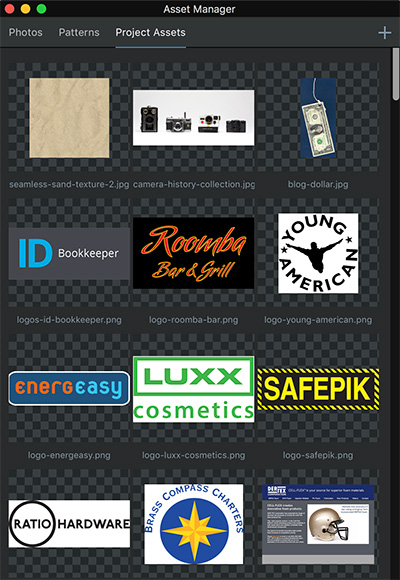
The Asset Manager
This brings up a large window with three tabs.The first two contain pre-canned photos and patterns. The final one is where you can import images into the project for placement by using the plus symbol in the upper right or dragging and dropping. Likewise you can drag and drop an image right into an image bric or even into a basic bloc on the canvas, where it automatically becomes a background image. Either way the image becomes part of the library and that is something that we could all do without at times. Pretty soon there are a lot of images to scroll through. If you delete an image off the canvas it still remains in the Asset Manager, until you delete it there as well.
Blocs should at least have a bypass option to import images without using the asset Manager at all. Quite frankly the sample images provided could just go away, as we cannot delete them and they grow each project file to 3 MB for no reason. In conclusion, If you know enough to import images into the Asset Manager, you might as well be able to import directly onto the canvas and skip the middleman. In my opinion, it should probably go away or become a library for things you keep using over and over.

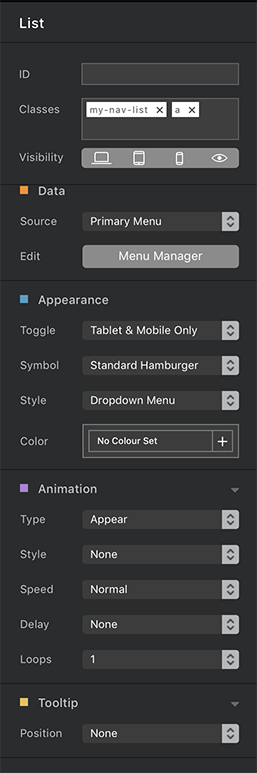
Menu Manager
This is where you define the links in your navigation by clicking the plus icon, or delete them by hitting the minus button. This is also where you can define sub menus. Links can be set to go to a page, an external URL, or a menu. You can style your navigation by creating custom classes called my-nav-list and my-nav-list a under the Class Manager. You can find that in the User Documentation under the Help menu, along with a currently closed old community discussion forum, and a link to the new discussion forum, which is at https://forum.blocsapp.com
Conclusion
Because of the current nature of the Asset Manager, this program would not be ideal for huge online catalog projects or publications, but for small to mid-sized web sites or for making the template for the supported CMS systems it is a pretty good choice, especially with the improvements seen in the Beta release. I am told by the company’s principal that the Asset Manager will soon be updated and be searchable. The thing that needs the most work with Blocs is its user manual. I search for things and they are hard to find if there at all. Try searching for “gradient" and you get nothing.
The software sells for $79.99 for an individual license that allows it to run on two computers. For $359 it will run on ten. That is $35.90 a seat, or an appetizer, drink and tip. As there is no monthly subscription fee, you can move on to a different platform and still be aple to acess legacy sites without having to pay ransom.
In many ways, this program offers great flexibility, but it still needs the ability to allow the user to create custom breakpoints. It also needs better support for social media buttons and the ability to use other web fonts than the ones that come from Google, especially for companies that are trying to maintain a look across different media. A new version 2.4 is under development for release in 2017 and should deal with the breakpoint limitations as well as providing more Blocs, Brics, and features.